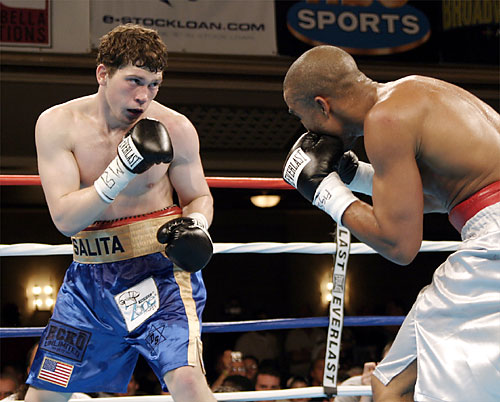
A boxer’s stance is the foundation upon which everything is built.
It’s critical that you get it right from the get-go for fast and powerful offense, and effective defense.
In time, you will develop your own boxing stance and style that will reflect what kind of fighter you are – technical, counter puncher, brawler.
Your build, height, strengths, and weaknesses will all play their part in developing a style that is distinctly you.
But before you bogged down deciphering your style, we need to answer one simple question:
What foot goes in front?
Orthodox or Southpaw
There are two general boxing stances – orthodox and southpaw – that are determined by which hand is your strong hand.
- Orthodox – left foot forward, right foot back, and your right hand at the back.
- Southpaw – right foot forward, left foot back, and your left hand at the back.
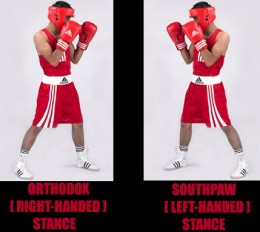
Neither is right or wrong or more advantageous, and it comes down to how comfortable you feel. The vast majority of boxers have an orthodox (or regular) stance as 90% of the population is right-handed.
However, you may write with your right hand and swing a bat with your right arm at the back, but still fight in a southpaw stance.
If you aren’t sure whether you’re a righty or a lefty, stand up now and switch between the two stances.
Try throwing a punch with the rear hand in both positions. One will feel more natural, or if you have good coordination, you may feel just as comfortable in either stance.
Usually, but not always, your strongest hand will be at the rear.
This means you can pop off the jab (low power punch) with your lead hand and use it to set up the cross (strong hand at the rear). The cross is your killer punch; it uses your strongest hand and comes from the rear, it has time and distance to build power.
For now, pick the stance that feels most comfortable and stick with it. Do not keep switching back and forth between stances. Professional boxers don’t do this, so you would be ill-advised to try it.
Some trainers will push you to be just as effective in either stance in the event you injure your hand during a fight.
What a load of NONSENSE!
It’s a convincing argument, but it’s more effective to master all techniques from the stance that feels most natural, before attempting to go all fancy schmancy.
It’s better to be a good boxer in one stance, instead of being mediocre in both stances.
Give it a year at the very minimum, before you even dare to get tricky and switch between stances.
Adopting a Classic Boxing Stance
The traditional on-guard stance is where all beginners should start from.
The one arm down, chin tucked behind the shoulder stance popularised by Floyd Mayweather is highly effective, but no one seems to be able to pull it off apart from the champ himself.
For now, adopt the classic stance.
In practice, this means keeping your hands at your temples, chin tucked, elbows in, feet shoulders width apart, lead foot forward, and strong hand at the rear.
It may feel unnatural or uncomfortable, and you can tweak it in time, but get the fundamentals right before making any adjustments.
The classic stance is most effective for protecting the head and defending the body. It also has the arms in a battle-ready position and up high and poised to spring out with a punch to your opponent’s head.
It’s effective for defense as the standing side reduces the target area an attacker can hit. And for offense, it positions your strong hand at the back ready to unload with rotational power.
The 7 Fundamentals of a Rock-solid Boxing Stance
Seven elements make up the classic boxing stance.
Whether you’re a Regular or Southpaw, ensure that your in-guard stance covers all these fundamentals.
1. Feet Shoulder’s Width Apart
Having a solid foundation is crucial when it comes to stance. You need to be balanced and have a solid base, yet remain sprightly and ready to pounce.
The reason is threefold: You push through your legs to get power in your punches, you need to be stable when taking hits, and you need to be able to move around easily.
Keeping your feet a shoulder’s width apart offers the optimal blend of mobility, stability, and a solid base to push off.
2. Where Are Your Toes Pointing?
The direction your toes point may seem like an insignificant nuance, but it makes a big difference in maneuverability and the effectiveness of both offensive and defensive techniques.
The toes of your lead foot should point towards your target, and the toes of your back foot should point to the side at an angle of 45°.
The heel of your rear foot should be roughly in line with the big toe of your lead foot.
3. Knees Bent Slightly
Never stand with your knees locked as you could injure the joint if you have to move suddenly, or you get tagged with a punch.
Having them slightly bent will mean you’re poised and ready to unload a punch, or spring away from an attack.
4. Don’t Be Flat Footed
You would think that the greater the area of your foot in contact with the ground, the more stable your base, right?
Not necessarily.
Being flat footed makes you slow and can even upset your balance. Keeping on the balls of your feet makes it easier to deliver fast, powerful attacks and means you’re nimble and can evade punches with ease.
5. Hands Up
ALWAYS, ALWAYS, ALWAYS KEEP YOUR HANDS UP!
I don’t care how tired you are; get into the habit of keeping your hands at eye level.
If you don’t, you might as well superglue a light switch to your chin. By dropping your guard, you’re openly inviting your attacker to plant one on your chin and turn your lights off.
If you’ve taken a few punches to the old noggin, and you’ve only got the mental capacity to remember one thing about proper stance, make sure it’s this one!
So remember, keep your hands up at eye level, with the lead hand slightly in front of your shoulder, and the backhand nearer the chin.
6. Keep Forward Slightly
Your weight should be forward as it’s much easier to counter the force of a punch if you’re already pushing forward. If you’re leaning back and you get tagged, you’re already going with the force of the punch and you’ll likely topple.
So, keep your spine slightly forward and lean forward ever so slightly.
Don’t concentrate on this too much as you’ll end up overdoing it. It will tend to happen naturally as you tuck your chin into your chest and keep your arms up in front of you.
7. Guard Tight
It’s no use having your hands up if they’re flailing around like chicken wings.
You want to keep your guard as secure as Fort Knox. Allowing just one punch to slip through could have devastating consequences.
A tight guard has four components:
- Hands close to your temples. Sometimes it’s best to have your gloves actually touching the side of your head when you’re learning so you’re aware when your guard drops
- Elbows tight to the body. Forearms should be parallel when looking front on.
- Chin tucked into the chest. A good training drill to make sure your chin stays tucked into your chest is holding a tennis ball with your chin while shadowboxing or hitting the pads.
- Shoulders slightly hunched. Protects your chin from hooks.
Following the above four practices wouldn’t leave any of your vulnerable areas exposed. Your arms are up high protecting your head, and keeping your elbows tucked close to your ribcage protects the body.
A subtle movement of the arm or a crunch to one side and you can block most of what’s thrown at you.
If you prioritise keeping our head safe like you should be doing, some attacks may slip through your guard and hammer the torso.
Here is where quick footwork and staying outside striking range would save your mid-section from pain.
However, even the most evasive fighters with the quickest feet are going to find themselves up against the rope at some point. In this case, you defend by tensing the stomach and crunching into whatever side the blow is coming from.
Tweaking the Classic Boxing Stance
The traditional boxing stance maintains a tight guard at all times which is your best defense against being knocked out.
However, there are a couple of pitfalls…
Firstly, your shoulders hurt like a bitch when you’re exhausted.
The secret is to relax as much as possible. Keep the position, but don’t tense your muscles until the split second before you take the hit.
Secondly, the classic stance leaves you so densely packed in and rigid, that you have no real maneuverability, and you end up blocking all of your opponent’s shots instead of employing artful dodging.
Blocking is an effective defensive technique, but why risk injury when you could move out of the way?
Personally, I like to have my hands up high, but not right beside my face.
If they’re slightly extended in front, then I can utilize all defensive techniques (slip, parry, block, duck and roll) and I don’t just automatically cover up whenever I see a fist heading my way.
However, if you follow this approach, make sure that you have A) got cat-like reflexes, and B) not over-extended your arms as you won’t be able to get any power behind your punches.
Conclusion
Even if you think you’ve got a tight and solid stance, you should run through the above fundamentals in front of a mirror to make sure you’re not missing anything important.
There is no right or wrong stance or any strict rules that call for your gloves to touch your temples when you’re in guard.
That being said, if this is your first rodeo, I highly recommend you implement all seven stance fundamentals and keep your guard extremely tight.
As your training progresses, you’ll settle on a stance that feels comfortable (but don’t get sloppy!) and takes advantage of your natural attributes.